Step-by-Step Instructions
How To Draw David Bowie
FREE TUTORIAL!


Drawing Supplies Needed:
HB, B, 2B, 3B or 4B Pencils
Tortillion / Stump
Kleenex
Soft Brush for wiping away debris
Mechanical Pencil (2B lead)
Clickable Eraser (Tuff Stuff or Tombow Mono Zero Eraser)
Kneaded Eraser
Strathmore Bristol Vellum Paper (I use the back)
The Outline
 Whichever your personal preference is for drawing do what makes you feel more comfortable. Despite what some artists will argue there are no hard rules when it comes to drawing although you will hear lots of opinions on the subject. Drawing by the grid method can be a good beginner choice in breaking down the chunks when drawing from a photograph if you feel frustrated with drawing freehand. You may also want to experiment with drawing freehand. By drawing freehand you will be able to understand shapes with relating to proportions better. It will also make it much easier to draw from real life when no photograph is available.
Freehand Method:
Yikes! Make sure you enlarge this video so you can see it! I apologize if my outline is a bit 'too light' for the video. It didn't seem this light in person but perhaps the lighting had drowned it out more. No going back now.
When drawing the outline of a portrait I will typically begin with drawing the eyes first and then move down to the nose and mouth before drawing the shape of the rest of the head. This is just my personal choice so if you begin with shaping the head first by all means do what you feel comfortable with first. What I like about freehand drawing is that there is no grid to erase and the fear that those lines can appear somewhere in my drawing should I draw them too dark.

Click For A Larger View
Grid Method:
This method has been around for centuries and has been used by numerous well-known artists until this very day. I know quite a lot of professional artists who use this method. The talent of creating something to appear realistic isn't just about drawing the outline of the subject but to get that outline to appear as realistic drawing in the end. The two go hand-in-hand. The same thing goes that you could be great at shading, blending and for getting in those details but if the initial drawing doesn't look at all like the person you are drawing it doesn't matter how good you are at it.
When drawing grid line make sure that your lines are light and not too dark. You don't also want to press down too hard or it will indent the paper.
Good Luck!
Click on the drawing for a larger view.
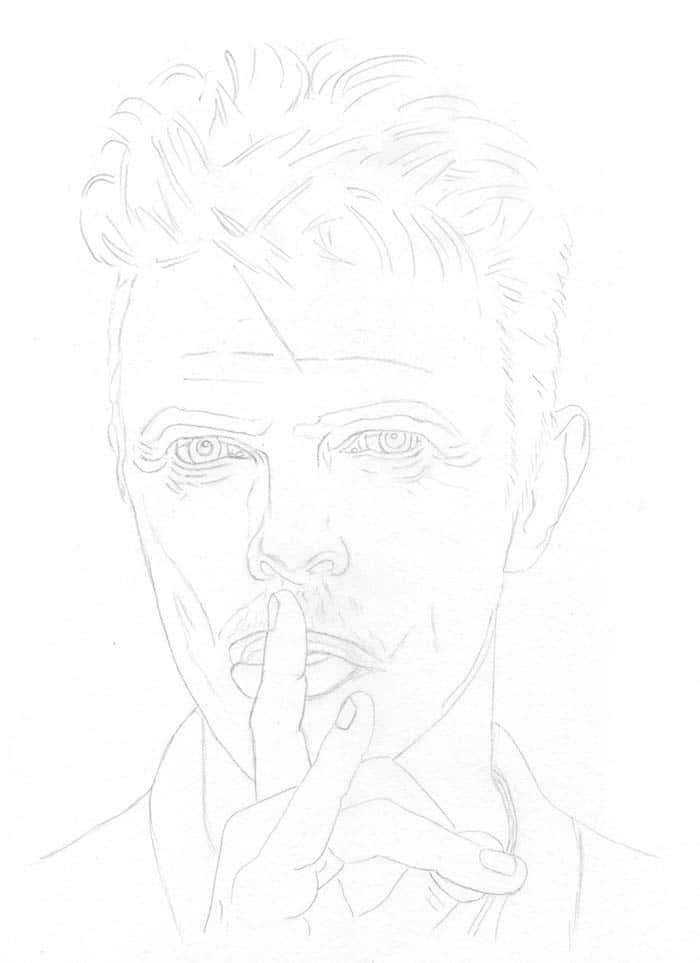
Make sure you draw the outline lightly. Do not give too much
pressure when drawing or you will create 'ghost lines'
when you shade over them.
Step 1
We begin with drawing the outline of David Bowie as shown above. I recommend using an HB pencil but if you find you are heavy-handed you may want to use a lighter pencil such as a 2H, H or B pencil. Try to make your outlines precise instead of sketchy loose sporadic lines. Creating sketch is fine as a preliminary before drawing it more detailed.
How to Draw David Bowie's Eyes

Step 2
Let's begin by drawing David Bowie's eyes. Take an HB pencil and map out the shading in the pupil, iris and around the eyes. You can darken the pupils with an HB or 2B pencil. The pupils should be the darkest on the eyes. You can then blend them in using a tortillion. Don't go too dark on the skin tones. Make sure you leave out the highlighted areas.
You will notice that one of David Bowie's pupils is permanently dilated. This was the result after his friend, George Underwood punched him in the eye while the pair were still at school (the fight was over a girl of course). The condition is called Anisocoria.
Step 3
Shade in the skin tones around David's eyes and along the sides of the nose. Notice the laugh lines and wrinkles along the sides and below the eyes (yes, we all get these as we age!) I blended in the skin tones using a kleenex as well as a tortillion to help darken in the shadowed areas.
Step 4
Shade in the sides of the whites of the eyes (eyeball) using a HB pencil. Blend them gently with a tortillion. Build up the shadowed areas and pupils using a B or 2B pencil. Use a kneaded eraser to take out highlights and a Tombow Mono Zerio Eraser for detailed highlights.
How to Draw David Bowie's Nose

Step 5
Use an H pencil to shade along the sides of the nose. Darken in the nostrils using a 2B pencil. A kneaded eraser helps to take out highlights while a tortillion is used to blend darker shades. A kleenex is used to smooth out the skin tones. Continue to build up the shadows on the nose switching back and forth to blend with a tortillion if needed.
Step 6
Take out highlights using a kneaded eraser on the top of the nose just under the bridge area as well as on the tip of the nose. A Tombow Mono Zero eraser can be great to take out detailed highlights.
How to Draw David Bowie's Mouth

Step 7
Begin by shading in the tones on the mouth using an H and 2B pencil. Blend with a Tortillion and lift out highlights using a Tombow Mono Zero eraser. Shade in the shadowed areas on the skin tones just under the bottom lip. Blend with a tortillion. Continue to build up shadowed areas.
Step 8
Stroke in moustache hairs using an HB pencil (you don't see David Bowie sporting a moustache too many times throughout his life).
How to Draw David Bowie's Face

Step 9
In working up the shadowed areas use a 2B pencil. A stump (or Tortillion) is used to blend in shadowed areas and a Kleenex is used to smooth. Work the shading into naturally building up the tones on the cheek.
Step 10
Take out some highlighted hairs in the chin using a TomBow Mono Zero eraser. These are great to use for these small details.

Step 11
Shade in both of the eyebrows. Blend with a Tortillion. Stroke out hairs using a sharp HB pencil or Mechanical Pencil. Use a Tombow Mono Zero eraser to gently take out highlighted hairs in the eyebrows.
Step 12
Shade in the forehead and blend with a Kleenex. Darken in shadowed areas using a 2B pencil and blend lightly with a Tortillion followed by a Kleenex. At this stage,I began to darken in the sides of David's hair and shaping his ear. Shading the darker shadowed areas in the ear with the 2B pencil and blend with a Tortillion. Take out highlights using a kneaded eraser.
How to Draw David Bowie's Hair

Step 13
Drawing David Bowie's hair is not the easiest. I mean just look at it! lol.
Begin by stroking in the direction of how David's hair is growing. I guess you could say that I am creating and map. After I have mapped out the direction of the hair strokes, I shade it in with leaving the highlighted areas. I then blended with a Tortillion.
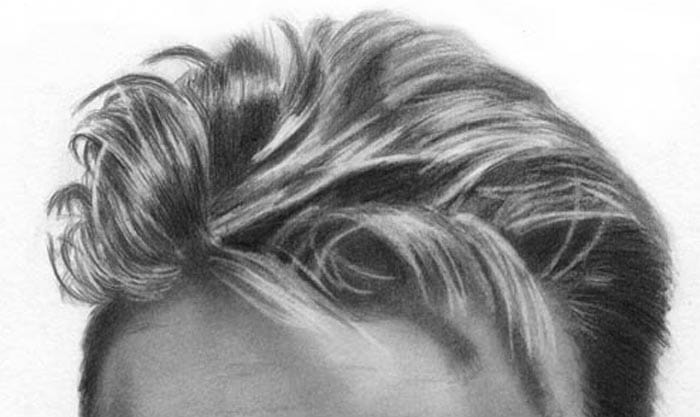
Step 14
I continued to work up the darks in the hair using a mechanical pencil and begin stroking in the hair while leaving out highlighted areas. I find the lead of a mechanical pencil to get precise detailed hair strokes. I then darken the shadowed areas of the hair using a 4B pencil. Take out highlights with a clickable eraser.
Darken in any shadowed areas on the forehead (if needed.) Blend with a Tortillion.
Step 15
Use a clickable eraser and map out highlighted hair that is falling onto David's forehead. Continue to work up the hair strokes, shadowed areas and highlights. You may need to go back and forth to the pencil, eraser and Tortillion.
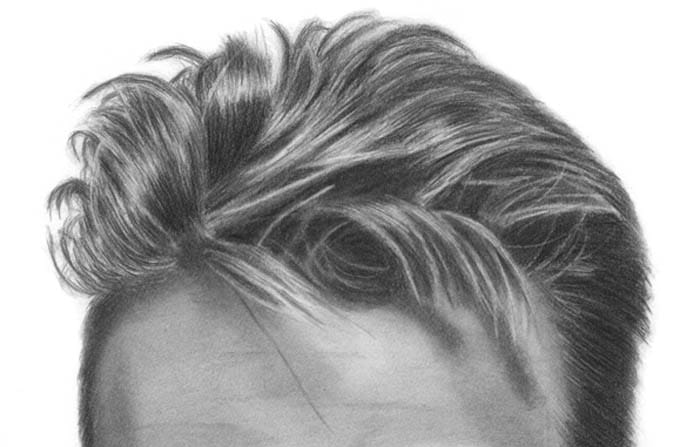
Step 16
Gently go over the highlights using a Mechanical Pencil in adding finer details to the hair.
Use the Tombow Mono Zero clickable eraser to continue taking out fine highlighted hair strokes in the darker parts of the hair .
How To Draw David Bowie's Hand, Neck and Shirt

Step 17
Using a B pencil continue with shaping the fingers with shading in the darks and lights. Blend with a Tortillion and a Kleenex to smooth.

Step 18
Shade in the neck using an HB pencil. Don't shade back and forth horizontally or vertically but rather shade it with following the contour shape of it (cylinder shape). Blend with a Tortillion.
Step 19
Use a 2B Pencil to shade in the dark jacket and blend with a Stump. Darken with a 4B pencil and again blend it all in.
Step 20
I then had went back over the next and fingers to fine-tune any details. I use a Tombow Mono Zero eraser to help take out the necklace David is wearing.
Sign Your Name!!
Leave A Comment