Step-by-Step Instructions of How To Draw Taylor Swift
FREE TUTORIAL!
Materials Needed:
2H, HB, 2B, 3B pencils
Tortillion
Kleenex
Soft Brush for wiping away debris
Mechanical Pencil
Clickable Eraser (Tuff Stuff or Tombow Mono Zero Eraser)
Kneaded Eraser
Strathmore Bristol Vellum Paper (I use the back)
Learn How To Draw Taylor Swift
 Click For Larger View
1. Start with drawing the outline of Taylor Swift. I recommend using an HB pencil but if you find you are heavy-handed you may want to use a lighter pencil such as a 2H, B, or F pencil. Make your outlines precise instead of sketchy with loose sporadic lines. Making a sketch is fine as a preliminary stage before your drawing.

Learn To Draw The Eyes
2. Let's begin with the right eye in shading the pupil with a 2B pencil. I always begin with shading lightly and then will build up my shading as I progress. Why I do this is so that if I want to make a change I can easily do this without leaving any residue behind on my drawing. I also feel that by layering you can build up the tones more naturally. Remember that every artist is different in how they draw or paint so these are my personal stages in drawing.
3. Start with shading around the eye. Next, shade in the pupil and begin building up layers. When shading in the iris, shade as though you are coming out from the pupil. Next, shade in layers to darken in the make-up above and below her eye where indicated. Blend all areas with a tortillion.
You can use the dirty tortillion to lightly add some grey tones to the corner of the eye.
4. Take a 2H pencil and lightly shade in the skin around the eye. You will see that she has some eye shadow above her eye to shade in as well.
Remember that we can always go back to the eye later to make any necessary changes.

5. So just as we duplicate the above steps, we are now going to draw Taylor's left eye (at least from our view it is the left one!) While we want to get the eyes to be as close as possible, no two eyes are the exact same.
6. Next, shaded in around the sides of the nostrils and inside the nose using an HB pencil. Shape the sides of the nostrils with a 2B pencil. Be careful not to darken them too much. The nostrils should be the darkest area on the nose here. Blend the nostrils with a tortillion.
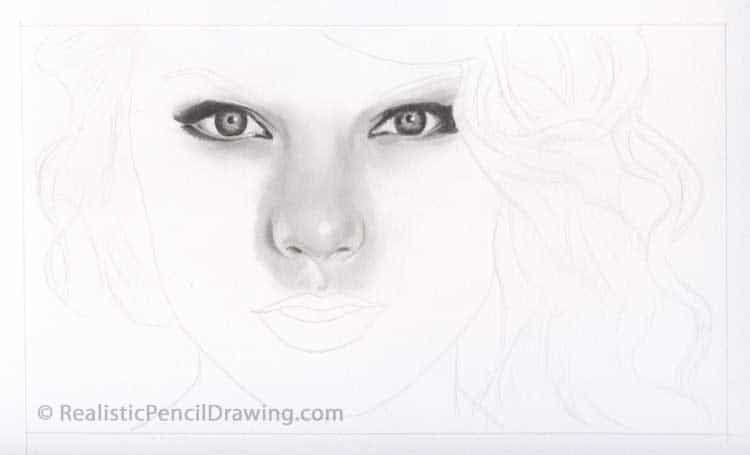
Learn To Draw The Nose
6. Again with an HB pencil begin shading horizontally the sides of the nose. As you shade down the sides of the nose, you will shade into the cheek areas.
7. Use a 2B pencil and begin building up the tones on the nose. Use a kleenex to blend.
8. Using a kneaded eraser dab out highlights on the top of the nose and on the sides of the nostrils.
9. Shade in the area between the bottom of the and the top of the mouth. Blend with a kleenex.

Learn to Draw the Mouth
10. As we begin shading the lip, take a 2B pencil and shade in the top and bottom lip. You will see in this illustration I have already blended in the top lip.
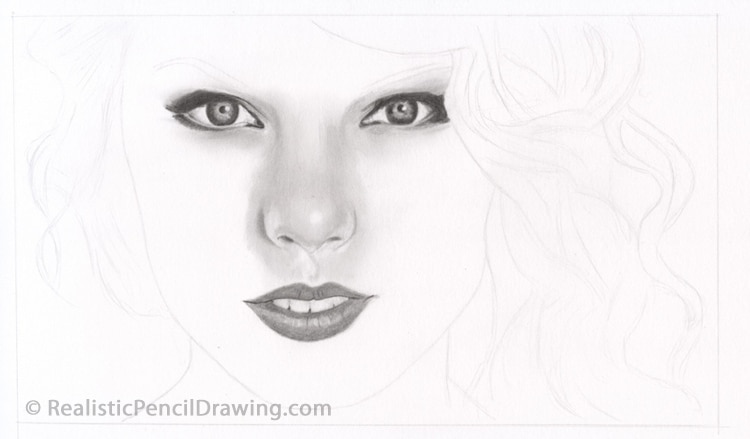
11. Continue with blending in the bottom lip. Use a 2B or 3B pencil to darken in the corner of the mouth and shadowed areas on the lips.
12. Darken the area between each tooth.
13. Take a clickable eraser and take out highlights. Next, use a 2B pencil and stroke in some creases on the top and bottom lip.
14. Continue building up the shadows and darker areas.
You may need to go back and forth to your pencil, tortillion, kneaded eraser and clickable.
Learn To Draw The Teeth
15. Shape the teeth using an HB pencil. Darken between each tooth again as well as the corners of the mouth. Shade in the area between each tooth.
16. Shade in the teeth and blend with a tortillion.

17. Take out lightened areas using a kneaded eraser.
18. Use a dirty tortillion to dark in the shadowed areas on the teeth. Again, you may be going back and forth to the kneaded eraser, pencil and tortillion.

Learn To Shade The Skin
19. Shade in the skin using an HB or B pencil. Make sure when you shade your strokes are close together in filling in any white gaps in between. You always shade in the face in a circular method. The shading should slightly curve down from the nose into the cheek area. The shading on the forehead and chin would be horizontally shaded.
20. Begin shaping the neck area under the chin. The shading should be a bit darker than the shading on her face. Blend all areas with a kleenex. Make sure your finger is placed in the kleenex and that it's not all scrunched up.

21. Continue with shading the right side of the face using the same steps. Continue building up shadowed areas on the face.
22. Shade and darken in the long shadow on her right side where the hair is making a shadow on her face.

23. Continue building up shadowed areas on the face.
24. Shade and darken areas around her eyes in building up shadows.
25. Shade in the eyebrows, blend with a tortillion. Stroke in hair on each eyebrow with making sure you stroke up and out in the direction the hair grows.
26. Stroke in dark eyelashes on the upper and lower lids.
27. I used an electric eraser to take out highlights around the corners of her eyes and then muted them with a kleenex.

Learn To Draw The Hair
28. Take a 2B pencil and shade in the darker shadow in the inside of the hair closest to the face.
29. Stroke in hair strokes with following the direction of the hair. Blend with a tortillion lightly making sure you don't lose too much of the strokes in the process.
30. You can either use a clickable eraser or electrical eraser to take out hair strokes.
31. Use a sharpened HB pencil or mechanical pencil to continue taking out hair strokes.
32. With moving to the right side of the hair. I began shaping the hair into 'chunks' with darkening in between them. I then followed each hair chunk with stroking the hair, blending with a tortillion and clickable eraser (or electric eraser). You also want to shade and darken in the shadowed area inside the hair closest to her neck and shoulder.

33. Continue building up hair strokes and shadowed areas between chunks of hair.
34. Use either a clickable or mechanical eraser to stroke out highlights and fly away hair to make it appear more realistic and natural. You don't want to have perfect hair...even on a celebrity. Make it natural.
45. Go back over your portrait drawing of Taylor Swift and make any final touch-ups. (There are always some).
Congratulations!! You have finished the drawing of Taylor Swift!
I love this tutorial, i was wondering if you could post another taylor drawing but with shorter hair
So fun to draw
Can’t do it
Why do you feel you can’t do it Emma?
AMAZING!!! AWESOME!!!! THANK YOU!!!
You are welcome!
AMAZING!!!!!!!!!!
Thanks!
You make the drawing looking so simple… may be that is the greatness lies in you. Can I ask you few questions?
Sure, Richard. Ask me some questions you have.
THAT’S AMAZING
i can’t do this
As a drawing beginner, just find it ‘s hard to draw and just fell my portrait is not good enough…
I`ve been astonished by this work and it made me realize that i really need to use an electric pen for hair strands. I do not know how to use a clickable pen for that very thin strands also will the shading be different at different papers( cause i`m using one) ?
yeah his right /\ how could a clickable pen could erase a very fine line please teach us ^^
To hard for me to do lol
i dont hv d materials 🙁 the only thing i had was d pencils
i can’t do this
awesome tutorial I do caricatures and am trying to sketch like this but they still come out wonky… any way try using the faber castell black pencil crayon as you can blend with it too just be patient and keep trying i think the drawings will get better with time and effort
You make it look so simple yet its hard to get it perfect!
I am only 12 and i find it hard to get prepotions right
Me too I’m 12
Thank you!! I LOVE this tutorial!
can you give us step by step instructions
This lesson is step by step. You have to provide your name and email address to get access to the lesson.
Hi my drawing is not that good but I beleave in my self!
Its very hard to draw exactly like this i can’t do it.I wish there was a simple way
I posted my sketch on my Twitter,dunno if it’s good enough
username : karson_ma_121
I don’t know how to sign in it won’t let me see the Taylor swift tutorial
You should have received a confirmation email. I have activated you to view the lesson.
Hi,
I confirmed my email for your newsletter, but I cannot view the tutorial to sketch Taylor Swift…. can you help Melissa…. thank you.
Best,
Sam
Hi Sam, Sorry about that! I guess you didn’t receive a confirmation email? Anyways, I have activated you now. 🙂
that was a great tutorial…thanks but I couldn’t draw the nose..BTW I’m a beginner…but great drawing….
Hi Melissa did you draw this and do the tutorial this is very fantastic .i love Taylor swift do you.
it’s been a day later after i confirmed, and i still can’t access the drawing step by step tutorial.
Luther, you should have received a confirmation email. I have activated you so you should be able to see it now.
It worked until i cleared my browser history; now it doesn’t work again.
Luther, type in your name and email again. It should work. Let me know if you still cannot access it.
still can’t access the drawing tutorial after confirmation.
Hi! Wow I have been following your videos and trying all of them on youtube. I just now found this website! It is so nice to find this website! Do you think that I could do this drawing with just some pencils, a kneaded eraser, and a torillian
Yes, but you may want a clickable eraser for the highlights in the hair. 🙂
wow i like it.and i succses drawing it! thx
Thanks Melissa…
But I can’t do it…
You are really a great artist
This drawing is amazing! But I cannot draw eyes or noses correctly. :/ do you have any tips?
Very well explained and this is begining to build up my confidence more.Thank you so much for this tutorial!
Very, very easy. ?? Thanks!
Hey, I was wondering what type of electric pen you were using for this?
I wasn’t using an electric pen. I am not sure what you mean.
It’s awesome. Thanks a lot, i’m trying but it’s not same like taylor ?. I’ll trying again
i wanted her short hair latest picture pls help me
it is so good.it helped me a lot to draw taylor swift
Hi i coudlnt do the hair or the nose for some reason it didnt workout and it doesnt look like taylor what can i do???
Hi i couldnt do the hair or the nose for some reason it didnt workout and it doesnt look like taylor what can i do???